 Nate Stormer
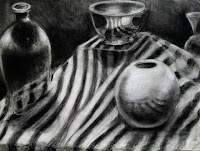
We finished up the reflective objects on stripped drapery this morning and there are many fine examples that were completed. I have selected a few of those: two from the 200 level, two from the 300 level, and one from the 400 level. I selected five because blogger will only upload five images at a time, so it's a matter of expediency, and I didn't want to bombard you with too many images. I selected these particular five because they were perhaps the most resolved in total form and that they also evidenced very strong observation.
I shot several others with the intent of posting them, but interestingly they manifested some issues when they were reduced to the smaller scale for posting on the blog. Some of the values washed out, ellipses became somewhat wobbly, and there were a few verticality issues. In fact, even now I notice that the silver bowl in Shawn's drawing is starting to lean a little to the right. Sometimes those kind of things aren't as noticeable when we're looking at them at their original scale.
I hope all of you see, even those not posted here, the strength in your drawings, because I think each of you did a very good job with this project. Many have gone beyond what I expected, and I think your patience with the stripes has paid good dividends. This was a five hour project, and the results indicate that the seven hours you're investing per week on your series will produce some very strong groups of drawings.
See you Thursday.


The project was very fun. I really enjoyed doing it. I hope to develop my skills further in your class.
ReplyDeleteI actually messed up the perspective in that entire corner. I'm not sure what went wrong, maybe I changed my position a little. Instead of correcting that entire side today, I just went on with it. It was actually pretty interesting to get an extra day on the drawing. Now, I wish I could stay after class on a few drawings.
ReplyDeleteI noticed something today while looking at everyone's drawings. It seems like a few are starting drawings from one object then filling in around it later. This makes creates more work later trying to squeeze everything else into the composition. There are many ways to start a drawing, mine is perhaps not the best but might give a starting point for your own.
1. Start by making a mark showing the top of the highest object and in your composition and the lowest. Then make a few marks showing where other objects fall. Maybe the top rim of a glass happens to fall exactly at the center of your composition so you make a small mark there.
2. Keep making marks and lines measuring relationships. Maybe a fold of the cloth is exactly the same level as the top of the glass. Soon, all the objects will start taking shape.
3. Work fast and very very lightly. Step back and take in your whole composition. Now is the time to make adjustments so that nothing gets squeezed in later or clipped off unexpectedly. Make measurements with your pencil held out in front of you if needed.
4. Look at the negative shapes and start defining them. Then work all over the drawing not paying too much attention to any one area for too long. Maybe rough in the darkest darks first. Try to see them as shapes by themselves.
5. By building up in layers you will be able to make corrections along the way without running into trouble. When Brian says, "pencils down..." your drawing will automatically be somewhat finished and resolved because the entire composition was created as a whole.
6. If something is not quite right never be afraid to ask Brian or your neighbor for a second opinion. Sometimes it takes a fresh eye to find the error you missed.
If this seems confusing, track me down before class and I will give you a quick demonstration. I can't say it is the best method, but it will work until you find your own recipe.
I would love to see that technique Shawn. Maybe you could save me a bench by where ever you decide to sit on Thursday so I can watch you start yours and try to apply it to my drawing.
ReplyDeleteOK, a bit off topic here Brian. :) My husband finished putting the poly on my bench this week and this is what I have to work with at home now. :) He's going to add wheels to it so I can move it inside and outside with ease for those nice sunny days that I wouldn't mind a bit of sunlight.
http://s46.photobucket.com/albums/f123/daughter_liberty/art/drawing/bench/
I think it would be a GREAT idea to not get into sitting in the same place every class, or next to the same person every class. Moving around the studio gives everyone a new perspective on approaches because everyone starts and develops images in very different ways.
ReplyDeleteI thought the most challenging part of this assignment was to not "ad lib" your own strips where you would prefer them to be. I enjoyed working around it and really looking at where the stripes fell.
ReplyDeletehmm my boyfriend tyler did say that Jessica did, it logged in under his google account..
ReplyDeleteI think this project was good for me to learn and follow lines and the movement of them as well. However, I think I need to work on my value ranges and make my dark values even darker.
ReplyDeleteThis project was very frustrating for me. I have used these objects before and felt like I had a much better connection to my drawing. I honestly couldn't get in the groove.
ReplyDeleteI had fun doing this. I'm not usually a big fan of still lives because they just don't hold my attention, but I really got into drawing the cloth. I think this was actually one of the first "fun" experiences I've had with a still life.
ReplyDelete